domingo, 8 de abril de 2018

Clean Code


Clean Code is the Foundation

Here you will find a checklist that I made. This can help us in our developments and in our code reviews. It is a summary of the key elements of the clean code.

General

These are the topics to be evaluated:
  • Clean Code is the Foundation
  • General
  • Package
    • Package Cohesion
    • Package Coupling
  • Classes
    • General
    • Class Design
    • Dependencies
  • Names
    • general
  • Méthodes
    • General
    • Principles
    • Design
  • Traitement des erreurs
  • Smells
  • Comentaires

Sources: 


sábado, 24 de septiembre de 2016

The Art of Solution Architecture


The "Art" has a communicative purpose by which ideas, emotions and world view are expressed; but also to illustrate and stimulate to the action. This makes a motivator for the architect to the extent that gives elements to observe, abstract, design, model, innovate, create and communicate to build innovative proposals to facilitate the activities of the humans on the organizations.

Based on these contributions of art, and of course, science and technology, the purpose of this book arises: a practical guide providing accessibles recommendations and orientations to implement Architectures.

I invite you to read this wonderful. Book


martes, 2 de agosto de 2016

IBM Bluemix Architecture Using the Microservices

There are tree types of IBM Cloud platform.

  • Public: PassS environment leveraging Softlayer virtual servers on Internet, quicly productive with architecture multi tenant. 
  • Dedicated: Is your own exclusive Softlayer environment yhat’s securely connected to both the public Bluemix and your own network (VPN) or a direct network connection with architecture single tenant.
  • Local: In on your own datacenter with OpenStack or VMWare, is more expensive for the process capability that require for bluemix, with architecture single tenant.

On bluemix, your organization could find service across for mobile, IoT, Watson and other services for other kind of applications.

Your organization need to evaluate and choose what critical components, can be run on the Public Cloud, Private Cloud or maybe on your own datacenter.

For example, for a mobile application that could be consume services provided by the different components deployed on NodeJS, java or other on bluemix through the communication protocol HTTP (REST).

¿What do you need?

  • Reuse all that you have on your solution/organization an project.
  • Choose the appropriate micro-services.
  • Ensure the security of your business.
  • Auto-scaling, High Ability (HA) and all related with alternatives, decisions, restrictions of the architecture.

Example High level Solution Architecture with micro-services


Proxy: Component developed in NodeJS, which functions as a gateway mobile applications, manages incoming requests, referring them to the internal component responsible for processing, through the services or operations configured in API Management. In addition, this server is responsible for masking data and keep in cache (quickly access), using Cache.

Cache: bluemix service that do the masking information to the end user, to ensure security in the public cloud, so that different identifiers maintained in session can not be traced, preventing them can access information from intruders. Also, this service charge to maintain recent and frequently consulted for faster data access.

API Management: bluemix Service that manages and consume services that are exposed in the public cloud, on the other deployed components bluemix.

Database: Service database bluemix (DBaaS), in which all the information managed by the components deployed in bluemix persisted.

Workload Scheduler: bluemix service that allows, through previous configuration automatically make calls to REST services.

The other components depend of infrastructure client, buy in general there are many layers of security before to arrive to applications as a Firewall, Identity Provider, gateways, ESB, applications, etc. For example, on bluemix you can integrated to a Federate authentication on the customer.

sábado, 22 de agosto de 2015

Testing CER Rules

After done the follow the Example - Creating a simple CER Rules you can test your CER Rules with the following steps:

Step 1 Generate Rules
Go to EJBServer DOS window because you need to extract the ruleset
Make build creole.extractrulesdata
Your ruleset will be extracted to \build\dataextractor\blob

Step 2 Copy files generatedSearch RulesPerson.xml and RULESET-RulesPerson1.properties and Copy it to EJBServer\components\custom\CREOLE_Rule_Sets (or whatever directory you are working in)

Step 3 Add body rule with correct version into DMXAfter add to or create EJBServer\components\custom\data\initial\CREOLERULESET.dmx an entry for your ruleset (You can copy the ssction generated on \build\dataextractor\blob\CREOLERULESET.dmx)
(if you use the extracted DMX you need to change the ruleSetVersion)

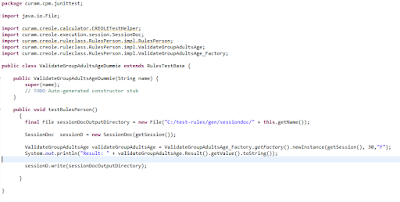
Step 4 Generate class Java for use into eclipse with JunitThen do build creole.generate.test.classes  and refresh in eclipse.  This should extent RulesTestBase, which in turn extends CuramServerTest.  You can then write your junit tests
Cúram create the class into
EJBServer\build\svr\creole.gen\source\curam\creole\ruleclass\RulesPerson\impl

Step 5 Invoke cer rules from java into eclipse
And you can use the object session for generated documentation.


Step 6 View Documentation and result about rule
Result after configured the session documentation


 You can help the statistics rules too for this part.

Example - Creating a simple CER Rules

This is an overview, as you can create a CER rules, it is not intended to replace the full 10 days of CER training that IBM offer.
 
Good, first, log in Cúram or Care Management as admin user after follow the next steps:
 
Step 1  Cúram Express Rule Sets
Go to Rules and Evidence.  Select "Cúram Express Rule Sets".
 
 
Create a new ruleset click "New" from the Page Actions Menu.  Give it a name and an optional category.  Click Save 
 
 Search your ruleset created and click "Continue Editing"

 Cúram show a new blank ruleset

 
 Step 2  Cúram a Class
Now click the "Technical View".  After add a class  (This is analogous to a Java class).


 After add age attribute with " Initialization" box is checked, after change the type to a number


 After add "gender" attribute the type String (also could be used condatables but now not)

 
 After create a “Result” attribute without class initialization check


After double click a “Result” attribute.  That contain the diagram for the attribute

 
 Step 3 Make the Flow Rule

On the right, there are the tools for works. The Idea is make the next condition: if is woman and age is between 27 and 50 years.

Set the tool palette to business default


After select "Choose" and drag and drop into the “Result” attribute on the diagram
 
  After select  the Result type (Boolean).


After Cúram Show, Click in save.


After drag and drop "And Group" and “Compare


  After drag and drop “Rule” and select the attribute “age


In the  tool you can select "Data Type" and drag and drop "number", for compare with the attribute age


In properties you can set a specific value for the compare


In the  tool you add, another "compare", "rule" for completed the rule compare


In the  tool you can add, another "compare", "rule" for completed the rule compare with the Gender, the same form.


 Save and validate.  Fix any errors.

 
Step 4 Publish the rule

Click in action publish, select check box and click on buttom publish.


domingo, 21 de junio de 2015

Configurando un ambiente de desarrollo de IBM Cúram Social Program Management Version 6.0.5.0 o IBM Cúram Management 6

Este post tiene como propósito describir los pasos necesarios para crear un ambiente de desarrollo CURAM, No pretende remplazar la información encontrada en el IBM knowled gecenter de IBM, por el contrario propende dar claridad y hacer un acompañamiento para lograr una instalación exitosa.

Prerrequisitos de instalación
http://www-01.ibm.com/support/docview.wss?uid=swg27036661
Guía Oficial de Instalación
https://www-304.ibm.com/support/knowledgecenter/SS8S5A_6.0.5/com.ibm.curam.nav.doc/kc_welcome-444.html

Paso 1 IBM Installation Manager
Instalar el IBM Installation Manager, este producto permite instalar los productos y las licencias necesarias.

Paso 2 Instalar Apache Ant
Instalar Apache Ant (apache-ant-1.8.2) de https://ant.apache.org/
Descomprimir en C:\Curam\apache-ant-1.8.2
Crear la variable  ANT_HOME en ”system environment” con el valor del path donde descomprimió el Apache ANT. Ej. ANT_HOME=C:\Curam\apache-ant-1.8.2
Crear la variable  ANT_OPTS en “system environment” con el valor:-Xmx756m


Paso 3 Instalar DB2
Instalar IBM DB2

Paso 4 Instalar Entorno Java
Instalar JAVA
Instalar java si se quiere, aunque si se instala was se puede usar el sdk de was.
Posteriormente crear variables de entorno:
JAVA_HOME= C:\Curam\Java\jdk1.6.0_18
J2EE_JAR=C:\Curam\Java\jee5_SDK\lib\j2ee.jar
Colocar en path el bin de JAVA_HOME: ;%JAVA_HOME%\bin;


Paso 5 Instalar Contenedor Web
Instalar Apache TOMCAT
Crear variable TOMCAT_HOME = C:\Curam\apache-tomcat-6.0.39  (path_version)


Paso 6 Instalar Plataforma Base y Módulos
Instalar el IBM Curam SPM Plataform 6.0.5.0 en c:\Curam\Development, solo para este módulo que es la plataforma base Cúram, pide los datos de la base de datos:


Instalar los Módulos adquiridos. Ejemplo:
  • Instalar el IBM Curam Outcome Mgmt 6.0.5.0
  • Instalar el IBM Curam Provider Management V6.0.5 Development Installer
  • Instalar otros módulos adquiridos…
Se siguen los mismo pasos que el módulo de la plataforma base dejando todo instalado en el mismo path.

O si es Care Manament solo ejecutar el instalador único que ya trae los módulos incluidos.

Paso 7 Crear Base de Datos
Después finalizado la instalación, proceda a configurar variables de ambiente de Cúram:
En una ventana de CMD en el path C:\Curam\Development  Ejecutar "SetEnvironment.bat"
Ejecutar el script de base de datos para crear la base de datos (ejecutar los siguientes comandos)

Asegurar de ejecutar los siguientes comandos en el mismo cmd/command prompt donde se haya ejecutado el comando setenvironment.bat

Asegurar de ejecutar los siguientes comandos en el mismo cmd/command prompt donde se haya ejecutado el comando setenvironment.bat

ant -f %CURAMSDEJ%\util\db2_createdb.xml
ant -f %CURAMSDEJ%\util\db2_postconfig.xml -Ddb2.dir=C:\IBM\SQLLIB
ant -f %CURAMSDEJ%\util\db2_createdb.xml restart.db2
ant -f %CURAMSDEJ%\util\db2_optimizedbrecreation.xml

Si se presenta algún inconveniente con la creación de la base de datos, se debe ejecutar el siguiente script que borra la base de datos y se debe crear de nuevo la base de datos

ant -f %CURAMSDEJ%\util\db2_createdb.xml dropdb

Paso 8 Configurar Variables de Ambiente
Probar al configuración
En una consola de CMD en el path C:\Curam\Development\EJBServer ejecutar el comando: build configtest

Paso 9  Ejecutar scripts de Servidor
CMD apuntando a EJBServer
build clean server
build database
build prepare.application.data
build runExtractor

Paso 10 Ejecutar scripts de Cliente

CMD apuntando a C:\Curam\Development\webclient
build clean client
build external-client -Dapp=CitizenPortal (Corresponde al módulo universal no está contemplado en el proyecto)

Paso 11 Subir XMLSERVER
ant -f xmlserver.xml

Paso 12 Descargar Eclipse
En el archivo .ini al principio del archivo colocar:
-vm
C:/Curam/Java/jre6/bin
Abrir eclipse y configurar Workspace C:\Curam\EclipseWorkspaces

Para iniciar Eclipse double-clicking en  eclipse.exe
  • Después seleccionar  Window > Preferences > Java > Installed JREs. On the Installed JREs page, ensure that the check box for the correct Java SE is selected as the default. 
  • Adicionar en default VM arguments, seleccionar Java SE y clic en EDIT. 
  • En el campo Default VM Arguments, colocar: -Xmx1024M -XX:MaxPermSize=256m -Xms512m.


Paso 13 Instalar el Plugin en Eclipse
  • Descargar el Sysdeo Eclipse Tomcat Launcher plugin
  • http://www.eclipsetotale.com/tomcatPlugin.html
  • Descomprimir el contenido del archivo "tomcatPluginV33.zip" en c:\eclipse\plugins
  • Iniciar eclipse con el parámetro: 

      -clean
      eclipse.exe –clean

Paso 14 Configurar Tomcat
  • Asignar version de Tomcat y Tomcat home
  • Windows -> Preferences -> Tomcat (set version to 6) and "Tomcat Home" = C:\apache-tomcat-6.0.39
  • Append to JVM Parameters, click Add, enter -Xmx512m, and click OK

Paso 15 Configurar Proyectos Cúram
  • Importar los proyectos de SERVER Curam
  • importar proyecto en el workspace para
     "C:\Curam\Development\CuramSDEJ"
      "C:\IBM\Curam\Development\EJBServer"

  • Importar los proyectos de CLIENT Curam
  • importar proyecto en el workspace para
     "C:\Curam\Development\CuramCDEJ"
     "C:\Curam\Development\webclient"

Paso 16 Configurar Tomcat
  • Después de importar los proyectos, clic derecho sobre el proyecto Curam y seleccionar propiedades -> Tomcat. Colocar las siguientes propiedades:
  • Seleccionar Tomcat Project y luego Update Context Definition
Paso 17 Instalando RSA (Rational Software Architect)
 
  • Importante instalar perfiles completos.
  • Generando Plugin para Eclipse: 
    Crear un directorio llamado
    dropins  en RSA ejemplo: 
    C:\ibm\SDP\dropins y crear un archivo llamado 
    rsa_plugin.link posteriormente editar el 
    shortcut de Rational Software Architect ya pasar como pa-clean


Contenido del archivo:


Paso 18 Ejecutar Proyecto
  • Verificar que la base de datos DB2 este arriba
Iniciando el Server:
  • En el  Package Explorer del eclipse expandir EJBServer > components > core > lib, right-click on core.jar, y seleccionar Run As > Java Application.
Inciando el Cliente:
  • Iniciar el Tomcat y ejecutar el RMILoginClient de tal manera que se pueda hacer la autenticación.
  • En el Eclipse menu, click sobre el tomcat del toolbar.
  • En el  Package Explorer del eclipse expandir EJBServer > components > core > lib, right-click on core.jar, seleccionar RMILoginClient and select Run as application
  • En el RMILoginClient window, colocar las credenciales

Paso 19 Ejecutar Proyecto

Autenticarse en  Cúram Social Program Management
  • Ingresar a http://localhost:9080/Curam/AppController.do